The Internet Phone: A
potent business tool

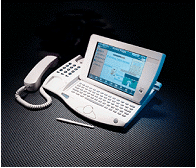
Routetrade has developed an application for the Internet Phone which allows retailers to place orders with manufacturers over the Internet. These orders can be placed at any time, with the data subsequently transmitted and integrated into the manufacturers' business systems.
The Internet Phone is a potent business tool. As an essential part of a new business system it improves efficiency and increases profits.
Preparing to Use the Internet Phone
Connecting Telephone Line(s)
The Internet Phone can be used with either one or two telephone lines. It is recommended that two lines be used so that it is possible to talk on the telephone and access the Internet at the same time. If only one line is used, it must be shared by the Internet browser and the telephone and you will not be able to use both features at the same time.
The Power Supply
The Internet Phone is designed to be left plugged in at all times so that the answering machine will work and its features are always available.
IMPORTANT: Without power, the Internet Phone will not work, even as a telephone. DO NOT USE THE INTERNET PHONE AS THE PRIMARY TELEPHONE IN THE BUSINESS OR RESIDENCE. THE INTERNET PHONE CANNOT BE USED AS A TELEPHONE DURING A POWER FAILURE. Always have a backup telephone that operates off line power for use during a power emergency.
Care and Maintenance
Using the Touchscreen
The Internet Phone features a highly sensitive touch sensitive screen for simple navigation and control. It is recommended the stylus is always used when touching the screen. Under no circumstances should you ever use a metal tipped instrument, pencil or other foreign object to touch the screen. Failure to abide by these guidelines may result in permanent damage and will void the warranty.
Cleaning the Touchscreen
Before cleaning the touchscreen, put the Internet Phone on standby. It is not necessary to unplug the Internet Phone. Use a slightly damp, soft cotton cloth to clean the screen. Under no circumstances should paper products or harsh cleansers be used since they may damage the screen or other electronic components.
General Care
If it becomes necessary to clean the Internet Phone's case, a slightly dampened soft cotton cloth is recommended. Do not spray cleansers or other liquids on the Internet Phone as serious and/or permanent damage may result.
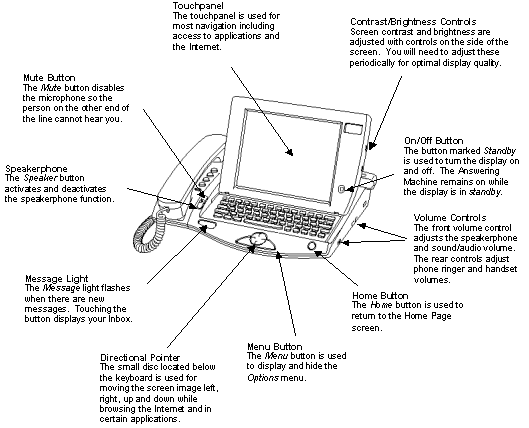
Basic Controls Diagram

Turning the Screen On and Off
To turn on the Internet Phone's screen, press the button marked "standby" to the right of the screen. Pressing this button again will turn the screen off.
Note: In order to preserve the screen's life, the Internet Phone will automatically turn the screen off if it is not in use for a specified period of time. To adjust this go to the screen option in setup Internet Phone's screen is designed to last for many years under normal operating conditions. Even so, it is best to turn the screen off when the Internet Phone is not in use.

Taskbar
The Taskbar stretches along the top of the screen and displays the following information

Menu Options
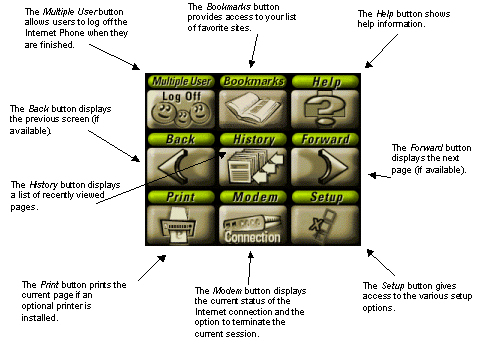
The Menu button is used to access various setup and other less commonly used features of the Internet Phone. The following options appear when the Menu button is selected.

Voicemail
The Internet Phone is capable of storing voicemail. To access Mail, press the message button or select Mail from the Home Page
The Inbox
The Inbox displays all new messages for each user. To view a message, touch the message header or icon with the stylus. After viewing a mail message, it is best to either delete or save it to your Saved folder. Please note that the storage space of the Internet Phone is limited so it is best to only save the most important mail.
The Message Button
The message button of the Internet Phone flashes whenever a user has new mail in his or her Inbox. Pressing the Message button will display the Inbox. The message light will blink as long as any user leaves mail in his or her Inbox so it is best to either delete or save any messages after they are reviewed.
The Answering Machine
The answering machine feature of the Internet Phone includes a customisable greeting and up to 20 minutes of recording time.
Checking Voicemail Messages
To listen to a voicemail message, select the desired message from the Inbox. Play All can also be selected from the Inbox screen to play all voicemail messages consecutively without pause.
Changing the Voicemail Greeting (OGM)
The voicemail greeting can be changed at any time. Select the Answering Machine option from Setup and follow the instructions.
Email
The Internet Phone is capable of retrieving email from any standard email address that can be accessed through the public Internet.
Configuring an Existing Email Account
To configure the Internet Phone to check your existing email account, select the Email option from Setup and follow the instructions on the screen.
Using the Internet Phone as your Primary Email Client
If the Internet Phone will be used as the primary or only way to check email, do not check the Keep a copy of mail on server button. This way, the email server will not fill up with mail and potentially cause problems due to space limitations.
Checking for New Email
To manually check for new email messages, select Check on the Inbox screen and wait to see whether you have any new mail. If the Internet Phone is not currently connected to the Internet, it will connect at this time.
Creating Email
To create a new email message, select the Edit screen in Mail and type the message using the keyboard.
Addressing Email
To address an email message, select Address Email from the top of the Edit screen. Enter the subject and use the Mini Address Book to enter the addresses of the people who are to receive the message or manually type their addresses in the To: field. (Note: use commas to separate multiple email recipients.)
Subject:
The subject of the email message.
TO:
The To: field is for the addresses of the primary recipients of the email message.
CC:
CC stands for Carbon Copy, and the CC: field is used to send copies of email messages to people who are not the primary recipients.
Sending Email
To send an email message after it has been addressed and typed, select Send from the choices at the top of the screen. Pressing Send places the message in the Outbox. You can save the message in the Outbox until you are ready to send it, or you can send the message immediately by pressing Send All.
Replying to Email
Reply to email messages received in your Inbox by pressing the Reply button. Selecting Reply All sends a reply to all of the original recipients of the message including those who were copied (but not BCC: recipients).
Forwarding Email
Messages may be forwarded to others by selecting the Forward button and entering the new recipient(s) email address(es).
Deleting Email
To delete an email message, open the message and select Delete. All mail in the Saved folder may be deleted by selecting the Delete All button.
Accessing the Internet
The Browser enables the Internet Phone to access the Internet and view web pages. Whenever a Web page is requested, and Internet connection is required so that it may be accessed, the Internet Phone automatically checks to see if it is currently online.
Uniform Resource Locator (URL)
The home address of any specific Web site is called a Uniform Resource Locator or URL for short. A URL is similar to a street address. Documents and files on the Internet have unique URLs that enable them to be found and displayed on the Internet Phone. URLs usually look something like http://www.infoclip.net -- but they can vary in length and format. URL's never contain spaces and the case of the type is important. URL's must be entered exactly as designed or the Internet Phone will not be able to retrieve them.
Send/Receive Status
The "S" and "R" indicators on the top of the screen stand for "Send" and "Receive" and display the current modem activity. When a Web page is being downloaded, the S/R indicators flash green when the modem is active.
Disconnecting from the Internet
To disconnect the modem from the Internet select the Modem option from Menu and press "disconnect." The modem will also be automatically disconnected after a specified period of time without user activity. (Note: to change this setting select the Network option from the Setup menu and change the appropriate value between 1 and 99.) A few seconds before the modem is automatically disconnected, a warning dialogue will appear. If no action is taken within a few seconds, the modem will be disconnected.
Cancelling an Internet Connection Request
To cancel a connection to the Internet that is in progress, press the Stop button at the top of the screen while the "Now Connecting" dialog box is displayed.
Internet Navigation
Most navigation of the Internet is done by simply touching the screen to request a Web page. Most Web pages have hyperlinks (text or images on the screen that automatically transfer to another Web page) that make navigation very simple and easy to understand.
Transferring Dialogue
After selecting a hyperlink, a dialogue box pops up indicating the Internet Phone is downloading the page selected. A status bar shows the progress of the download. The "cancel" or "stop" buttons can be pressed at any time to stop the transfer.
Going Back
Selecting the "back" button on the top of the screen displays the previous page viewed.
Entering a URL
To go to a specific URL, touch the title area and enter the new URL in the text box. When finished, press OK (on the screen) or Enter (on the keyboard). The Internet Phone will then automatically connect to the Internet (if not already connected), find the page and display it.
Displaying Current URL
To see the URL of the currently displayed page, touch the title area of the screen and select Current URL.
Reloading a Page
To reload the currently viewed Web page, touch the title area to display the URL dialogue box and press "OK." The currently viewed page will be reloaded.
Bookmarks
The Bookmarks feature allows preferred or frequently visited Web sites to be quickly and easily accessed. Each user of the Internet Phone can store their own custom bookmark list. To access the Bookmark dialogue box select the Bookmark option from Menu.
Selecting a Bookmark
Touch the desired bookmark from the Bookmark dialogue box.
Adding a Bookmark
When viewing the desired Web page to be added, select Add Current Page from the bookmark dialogue box.
Deleting a Bookmark
To delete a Bookmark, select Delete from the Bookmark dialogue box and then select the bookmark to be deleted.
History List
The History list is a list of all recently viewed Web pages that enables a specific page to be quickly accessed. To view the History list select the History option from Menu.
Placing an order
Placing an order with a supplier on the Internet Phone requires following these steps:
1. Use the stylus to touch the 'purchase order' button on the Home Page screen.
2. A menu will display the names of the various suppliers. Touch the one with which an order is to be placed.
3. The order form will be displayed. Touch each item required on the screen and fill in the quantities by pressing the appropriate numbers on the keyboard.
4. Scroll down the screen and press the 'submit order' button.
Download this document in Microsoft® Word format.

